Friday, August 19, 2011

MY LITTLE ALIEN....

I just love this shirt and I had to make it a one page layout. I have been trying to step outside the box and do layouts. While I was at my retreat I made this page using the All Mixed Up Cricut cartridge, which I don't own!! I love going to crops and using other people's stuff!!!

I bought the alien stickers & polka-dot paper soooooooo long ago, I think they were from the Target dollar spot section. I love how crazy yet cute this page turned out to be. The top right box is for my journal box to write about my crazy little alien boy Ryan Arthur. I just love this little alien of ours!


Hope you enjoy!!

Crafty Hugs and Kisses!!
Cindy :)~

Wednesday, August 17, 2011

Heart Felt Thanks

As I mentioned in my last post 2010 was a terrible time for my family. I started out the year spraining my ankle, a few weeks later I feel/passed out and fractured my C4 vertebra. I was in a neck brace for 12 weeks. We learned the reason I passed out was because I had "Valley Fever". However none of this physical pain could prepare me or my family for the emotional heartache and pain we felt on May 6, 2010. My beloved brother, Arthur, lost his LONG, hard fight to Lung Cancer. He was a beloved son, husband, brother-in-law, uncle and brother and only 46 years old.

We were able to make it back home to IL and were by his side when he passed away. We were and are forever changed as a result of this HUGE loss. In order to channel my energy into something positive I became aware of a walk happening in my community. This is a walk that has been going on for years but was being brought to our town. It is called the American Cancer Society's Relay For Life. Ironically enough I never heard of this walk. I had participated in several breast cancer walks but nothing like this. I was able to raise over $2000!! As a thank you I wanted to mail out homemade cards. I had so many to make I tried to make them special, yet easy enough to mass produce.

I have already starting to think about my next thank you cards for the walk in 2012. I think I am going to invest (unless you'd like to donate a set to me Robyn?!?) in My Pink Stamper stamps "Hope & Courage" or "Everyday Sentiments".

I really hope you enjoy this. This is a very special card that truly was made with love and gratitude and I will forever cherish it.


RECIPE:
*Gypsy
*Wild Card Cricut Cartridge (Heart Felt Thanks) 2.71"w x 1.75"h*Gypsy Wanderings (Decor Tag) 3.05"w x 2.14"h
*Lavender Stickles
*
Ribbon*White 8 1/2" x 11 Card Stock (cut in half)*Decorative Paper*Zots 3D Clear Adhesive Dots

Like I always say...CANCER SUCKS!!!

Have a blessed day.
Cindy :)~

Tuesday, August 16, 2011

CANNON BALL

Sean had asked for a pool party over the summer in 2010...however it was such a terrible year for my family I was unable to get it organized let alone work up the energy to do it. He was very understanding so because of that once school started up in August 2010 I found the first 1/2 day and planned a pool/popsicle party for him and his friends. We were able to get pictures of each boy doing a cannon ball into the pool. I had extra sun's from Sean's last day of school bags, which I used as a frame of him jumping in. I love how this page turned out.

On the top of the page that is the invitation I made for Sean to hand out. I always make/keep an extra invitation for my pages. I like to incorporate them some how. I did this page during my scrapbook retreat and one of the girls came up with the idea to do little tags next to all the pictures of the boys. I wanted to put their names but couldn't figure out how to do it. I have so much on one page I just didn't have the room in my journal box.


This was one of my top 5 favorite pages I did during my get away. I hope you enjoy it...enjoy the rest of your summer!!

Keep on Craftin'
Cindy :)~

Friday, August 12, 2011

Show Your Style Blog Hop Challenge

It's time for a My Pinkalicious Blog Hop with My Pink Stamper and her brand new design team. Here is the challenge...Show Your Style.
Challenge: Show us YOUR style making your favorite thing! This could be your favorite color combo, your favorite Cricut cartridge, your favorite technique, etc.

Here is what I am posting as my favorite technique & color combo!!

THE BIG DAY:
I am going to a wedding next weekend in Mexico and I needed to make a card to go with the gift my parents and I are giving. I did some searches online for some cute ideas and came across this person's CUTE cards and such.

I am "borrowing" one of her wonderful ideas for my card. The bride's colors are turquoise and cobalt blue...so I think this came out so, so, so SWEET!


My favorite technique is square, with a mat, glitter paper and Stickles.
My favorite color combo black & white


RECIPE:
**Paper Doll Dress Up Cartridge (for wedding dress & tux lapels)
*Indie Art Cartridge (for diamond for tux)
*Beyond Celebrations Cartridge ("the big day")
*Glitter Paper Pack by Colorbok (loving me some glitter paper but I WILL NOT USE CHEAP PAPER AGAIN) As you can see some of the black glitter is on the white diamond and wedding dress
*True Blue Stickles
*Zots 3D clear adhesive dots
*Black 8 1/2 x 11 paper cut in half
*Tape Runner
*Darice Self Stick Gems
*Creative Memories Circle Punch 1 1/2"

I hope the new Mr & Mrs enjoy this homemade card.

Much love and crafting...
Cindy :)~

Caught Ya!


I am so super excited with this project. My son is attending a brand new school and I received an email from the principal asking me to decorate a shoe box for the teachers to put in it their "Caught Ya's". Caught Ya's at the school are for those students caught doing good things. I used stuff I already had on hand. I love how this turned out and I know our Principal really liked it.

The wooden apple I have had for a few years for another project, which I never used. I bought it at Hobby Lobby. I my letter stickers, I have had for years instead of writing "caught ya" on it. I used plain white Elmer's Glue to stick the paper to the shoe box. Then I made a homemade modge podge for the sticker letters and the top of the paper already glued on the box. I attached red ribbon, painted the inside of the box black and finally attached the apple with Zots 3D clear adhesive dots.

Thursday, August 11, 2011

It's a Potty!!


I loved making this page sooooooo much!! Here's something I made when I was a part of Inking It Up Crazy "Old School" BLOG HOP

RECIPE:
*
Gypsy
* Stretch Your Imagination Cartridge
* 2 6" x 12" Provo Craft Doodlecharms paper pack
* Karen Foster Design Card Stock Stickers "Potty Training 2"
* Brads
* Tape Runner

I used my gypsy and the card frame option for Stretching Your Imagination. X is at -0.23, Y is at -0.00, Width is 12.58" and Height is 12". It will be larger. I did it this size because I didn't want so much of a blue boarder around the page. I love how this looks. I plan on using other cartridges and making fun backgrounds for my scrapbook pages. It's definitely fun and allows me to step outside my scrapbooking box.

--->
Card Frame can be found 4th row, 7 squares in<---

Thanks for stopping by and checking out my work.
Have a great day!!!
Cindy :)~

Wednesday, August 10, 2011

Papa can you hear me???

So this page was so fun to do...what great memories. We did a staycation in 2009 (yes I am that far behind) and I remember as if it were yesterday. We had called my parents who were doggysitting Rocky for us and Ryan wanted to "talk" to Papa...so here is how he looked while "talking" to Papa. He was 1.5 years old at the time.


I feel in love with this paper I used for the background and had to have it!!! I used my Best Occasions Glitter Paper pack for the belly, journal box tag & words. I made this page at my crop in Tucson so I was able to borrow the paper punch for the tag and the ........ cartridge for the words. I love going to these kind of crops like this because I am able to use other people's cartridges and tools.

I had a hard time finding paper to match the teddy bear that is behind Ryan, so I cut the bear using my Doodlecharms cartridge and then used a brown ink chalk to darken/tan him up.


Have a fantastic, crafty day!!
Cindy :)~

Tuesday, August 9, 2011

CELE-BR8

Here's a card I made for our God daughter's 8th birthday. I used my Stretch Your Imagination Cartridge for the card. I used my Gypsy to hide the candles and the silhouette feature for the outline of the cake. I used stickles to color in the cake part. I used the Mickey Font Cartridge for the number 8 and Celebrations Cartridge for "celebrate". This was a super easy card, but yet looks cute.

I know she'll enjoy the card and I hope you did too.
Thanks for stopping by!!!

Have a great day!!
Cindy :)~

Monday, August 8, 2011

Thriller...


Here is a scrapbook page I made for my son's talent show he and other kids were in. We did a 2 minute "reenactment" of the Michael Jackson's Thriller video. I made this page using the Halloween Solutions & Hannah Montana cartridges while I was at my scrapbooking weekend in Tucson. I used Best Occasions Glitter & Metallic paper packs for this layout.


I made a backing for my scrapbooking journal box using a Martha Stewart Drippy Goo punch (again borrowed at my weekend crop). I also used this punch for the red paper top and bottom that I placed on top of the silver backgroup paper. I love how this page turned out, it's so CREEPY just perfect for all those cute Zombies.

Have a great day!!
Cindy :)~

Friday, August 5, 2011

Blog Hoppin' it Old School


Welcome to Cindyrella's Creations and the Old School Cartridges Blog Hop!

If you've come from visiting Christi at Scrappin' 5 Little Cupcakes you're in the right place! If you've just happened across my blog and would like to play along with our fun hop, you can click HERE and start at the beginning. We would love to share a few projects and ideas with you using the older Cricut cartridges. So get ready for some super fun projects and some fun giveaways along the way! After you have finished the hop, be sure to head on back to INKING IT UP CRAZY HERE and create and link up a project of your own using one of your older Cricut cartridges...the older the better.
Make sure to check out each member's blog. There will be some fun prizes along the way, AND there will be some AWESOME ideas!

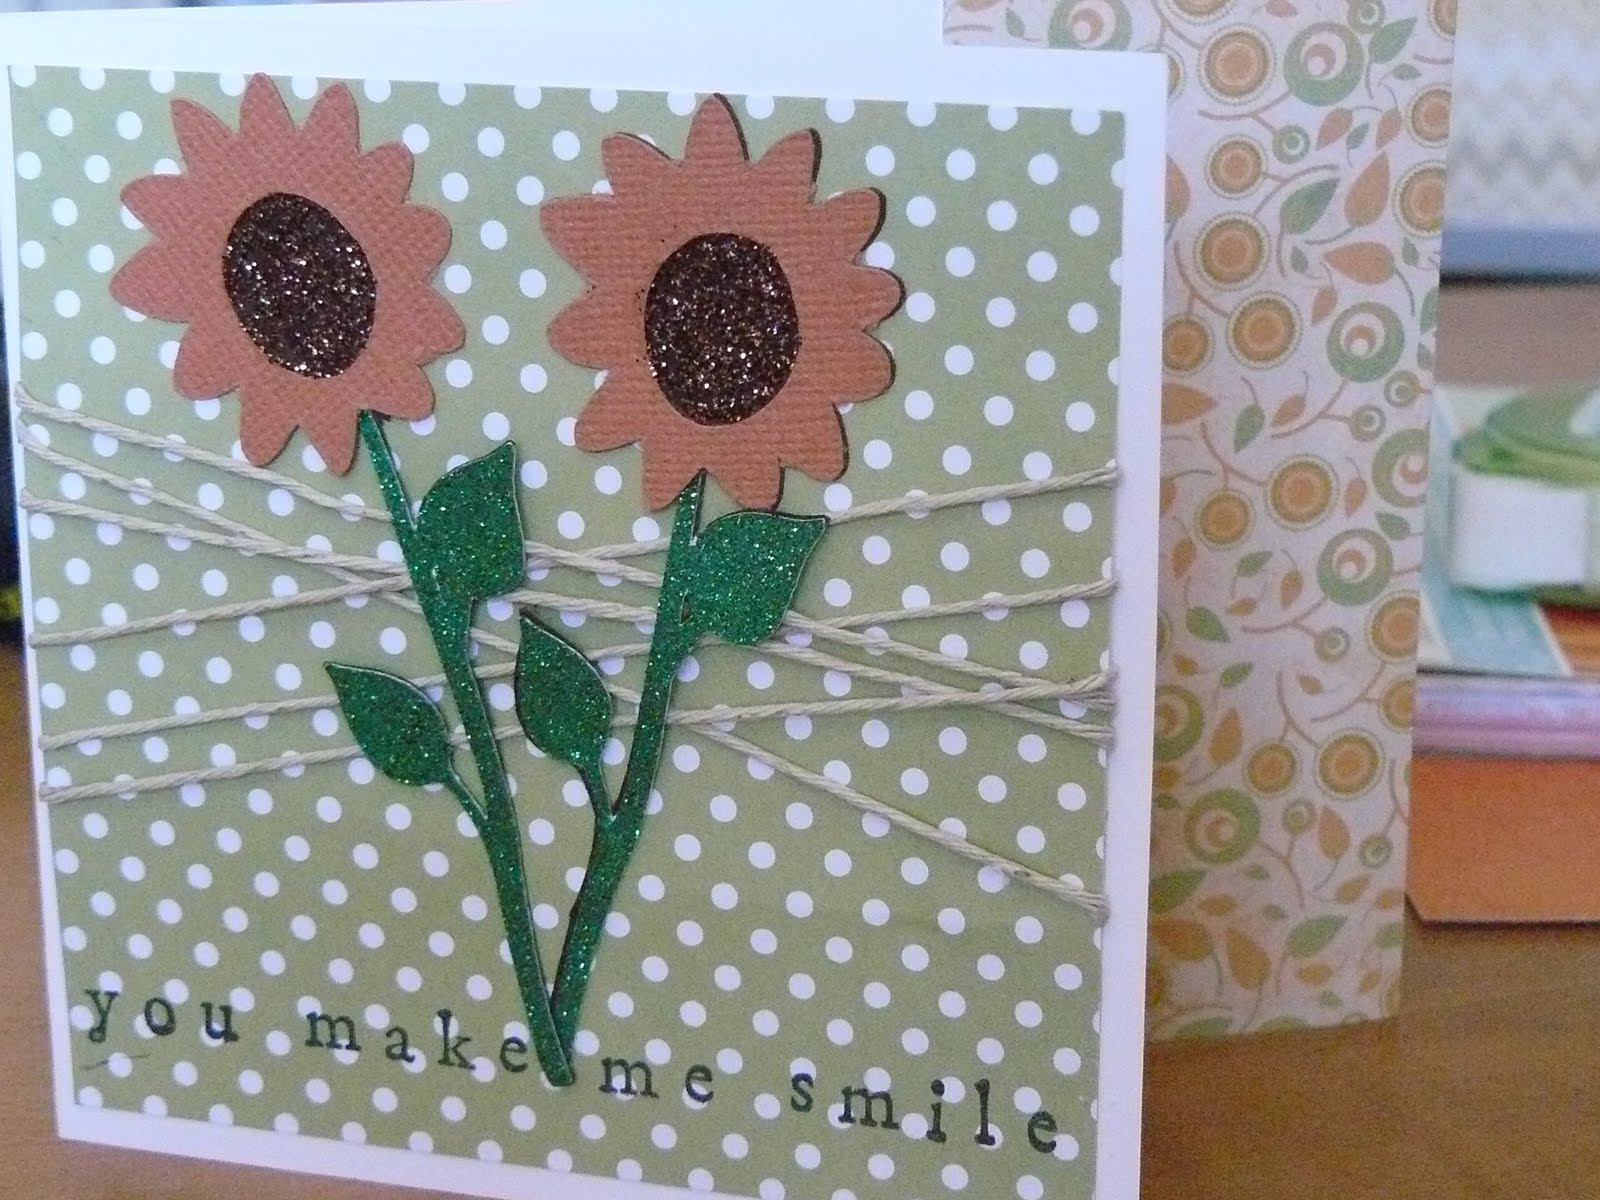
YOU MAKE ME SMILE SUNFLOWER CARD

ITEMS USED:
*Cricut Cartridge: Stretch Your Imagination
*White Card Stock cut 4.25'h x 9.75'w
*Green Polka Dot Card Stock cut 4' x 4'
*Orange Strip cut 4' x 2'
*Hemp Cord
*Stickles Cinnamon Color
*Brown Card Stock
*Green Glitter Card Stock
*Orange Card Stock
*Xyron Create-a-Sticker
*Stampin' Up "Simple Sayings II"
*Gypsy
*Cricut
*Scotch Tape
*Scrapbook Tape Runner

RECIPE:
1. Fold White Card Stock at the 4.25'

2.
Attach orange strip to right side of card base

3.
Attach hemp cord with peace of scotch tape to back of green paper, wrap around as much as you'd like and attach to the back with another piece of scotch tape

4.
Attach green paper to card base

5.
Using my Gypsy I created 2 sunflowers by using the shift function. Their dimensions are at 1.46'w x 3.82'h. I cut 2 of them using brown card stock. Since I was using scraps for the flower and stem, I used the hide feature when cutting them. I cut 2 flowers in orange card stock while hiding the stems and 2 stems in the green glitter paper while hiding the flowers. This function on the Gypsy is something I use on most everything I cut...it saves time and paper.

6. I used my Xyron Create-a-Sticker to assemble the flowers and attached it on top of the cord.

7. In order to make the card POP I used my new Cinnamon color Stickles
for the center of the flower.

8. Lastly I stamped a simple saying to the card. I am new to the card making world so I only have a few stamps...I hope to add more to my collection as I am really enjoying this new found creative outlet.


I hope you enjoyed my card and it made you smile!!

Thanks for "kickin' it" with me "old school" while I was "stretching my imagination" on my FIRST EVER blog hop. Next stop...Kathy's blog Kathy and Kids
Go see what she has in store for you today...

Have a creative, crafty day!
Cindy :)~


LIST AND ORDER OF BLOG HOP:

Kassidy at Inking It up Crazy
Peggy at I Crea8Cards
Justina at Just My Crafts
Cheryl at Pink and Paper
Amy at Scrapping, Card Making and Living with Fibro
Holly at Holly's Hobbie
Diana at DL.ART
Cristi at Scrappin 5 Little Cupcakes
**YOU ARE HERE** Cindy at Cindyrellas Creations
**NEXT BLOG** Kathy at Kathy and Kids
Lindsey at Cricut Crazy
Amy at Scrap This, Save That
Susan at It's Me Susan P

Monday, August 1, 2011

Easy Thank You Card

One of the activities we did this summer was my oldest was a part of a swim team. I was asked by a friend to make a thank you card the kiddos could sign for their coach. She knows I am into making cards now, so it was NO TROUBLE. I made a very simple 5x7 thank you card.

RECIPE:
*White Card Stock
*Beach Theme Paper (from a paper pack sold at Target, several years ago in their dollar section)
*Orange Ribbon
*Best Occasions Glitter Pack (green and blue)
*Printed up Thank You Saying
*Tape Runner
*Xyron 1.5" Create-a-Sticker
*Zots 3D Clear Adhesive Dots
*Scotch Tape


1. Cut beach paper at 6.75"w x 4.75"h.
2. Attach orange ribbon to paper. My ribbon was a scrap piece, so I attached it on the back with scotch tape.
3. Attach paper to card stock with tape runner
4. Run Thank You saying through Xyron as well as one of the glitter squares. (the Xyron is probably one of the few adhesives that works on this glitter paper...it's cheap paper so glitter gets EVERYWHERE. Next time I buy glitter paper I am spending the $$$ to buy the kind that doesn't "shed")
5. Attach all squares, use Zots 3D adhesive dots to attach thank you square on top of ribbon strip.

VIOLA!!

This card literally took minutes and the kid's coach LOVED IT!

Have a fantastic day!!
Cindy :)~